





Tips Index
Brief Introduction of FLV
FLV is short for Flash Video. FLV is a file format used by Adobe Flash Player and Adobe AIR to store and deliver synchronized audio and video streams over the Internet.
Because of its small size and fast loading speed, it makes it easier to watch online – especially in cases, for example, where you have a slow internet connection.
Therefore, most of the video websites use FLV format.
Reasons for using FLV
The most basic requirement for playing video on the network is that everyone can see it. If use formats like RM, WMV, MOV, MP4, etc. and there is no related decoder or player on the computer, then this video will not be able to play.
Today’s mainstream operating system, Windows system, has equipped Flash playback software. So FLV has become the best choice for network video format.
How to open FLV File?
The mainstream players now support FLV format playback.
Solution for FLV format conversion
Converting all kinds of video into Flash video files solves the problem that other general video files may have, that is, need a decoder for playback.
Here we will guide you on how to convert video files to FLV format.
VideoPower BLUE is a great software that has a lot of functions and features such as screen recording, basic video editing, slideshow creation, and audio and video conversion.
You can try to use the software for free by downloading its trial version below.
Step 1: Add the WMV file to the program
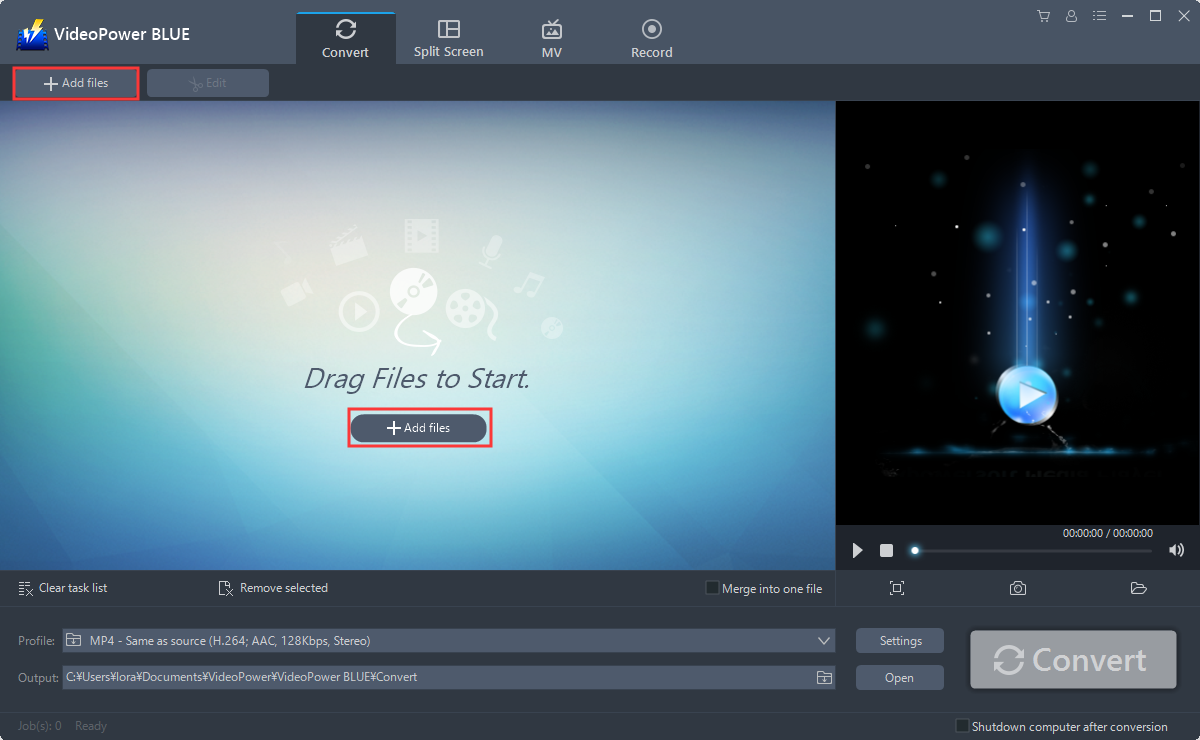
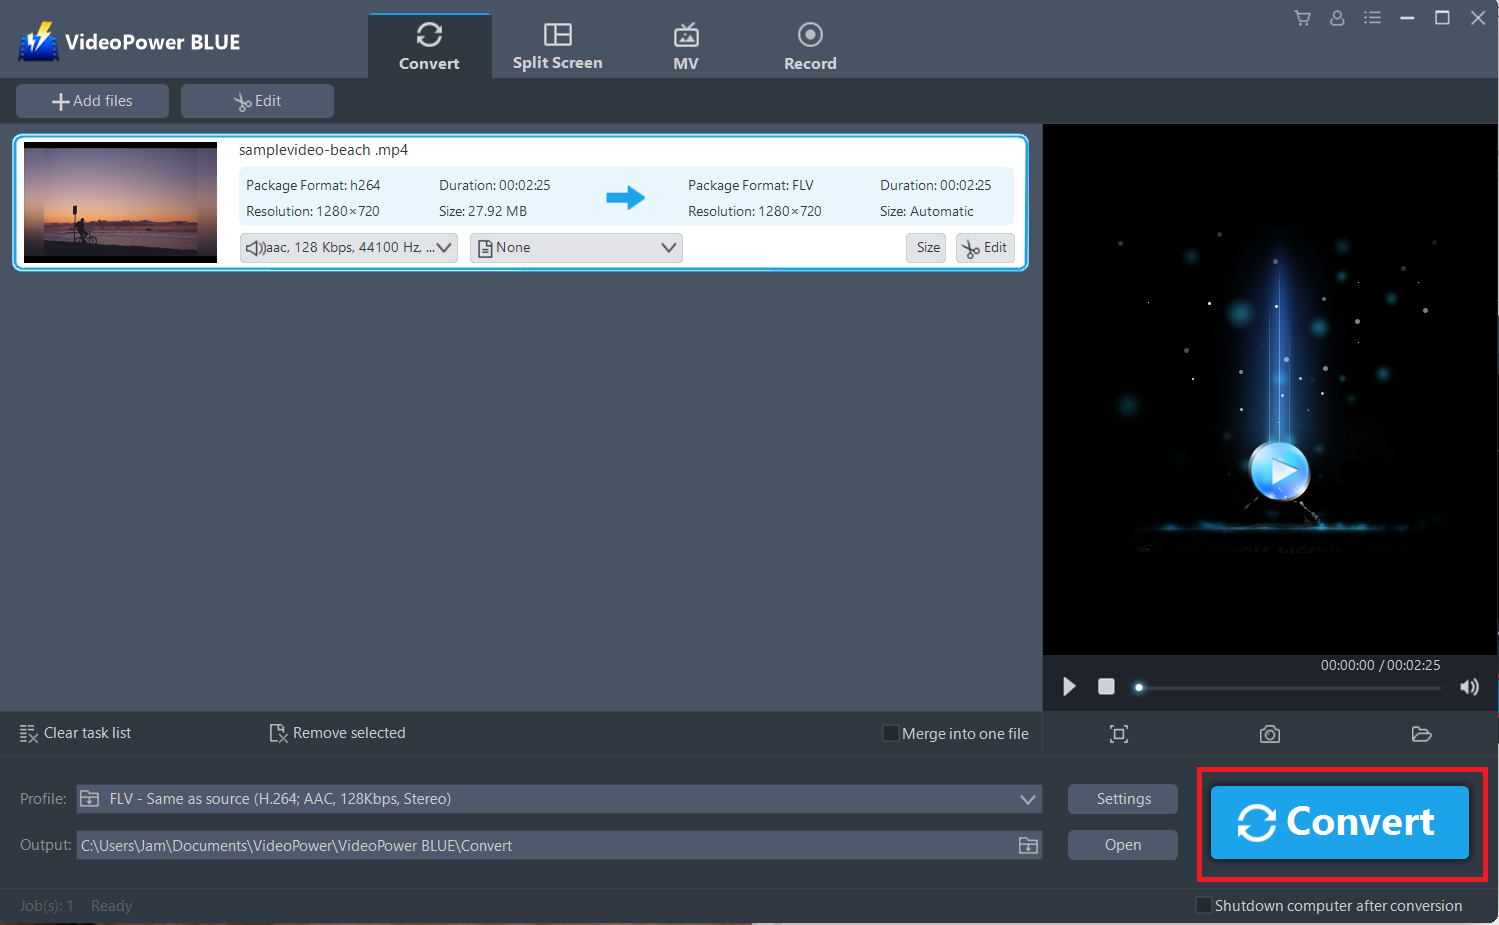
Run the program if you have installed the Video Converter software – VideoPower BLUE successfully on your PC. You can directly import the file to the program by clicking the “Add files” button or by drag-and-drop the file to the interface. For this example, we’ll use an MP4 file to be converted into FLV.
Step 2: Edit the video
If you need to edit the video first before converting, just follow the instructions below.
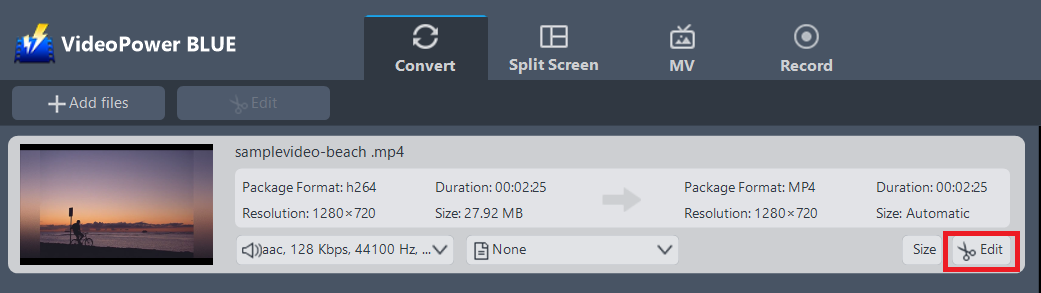
The imported MP4 file is displayed in the list.
Click the “Edit” button on the right side of the file.
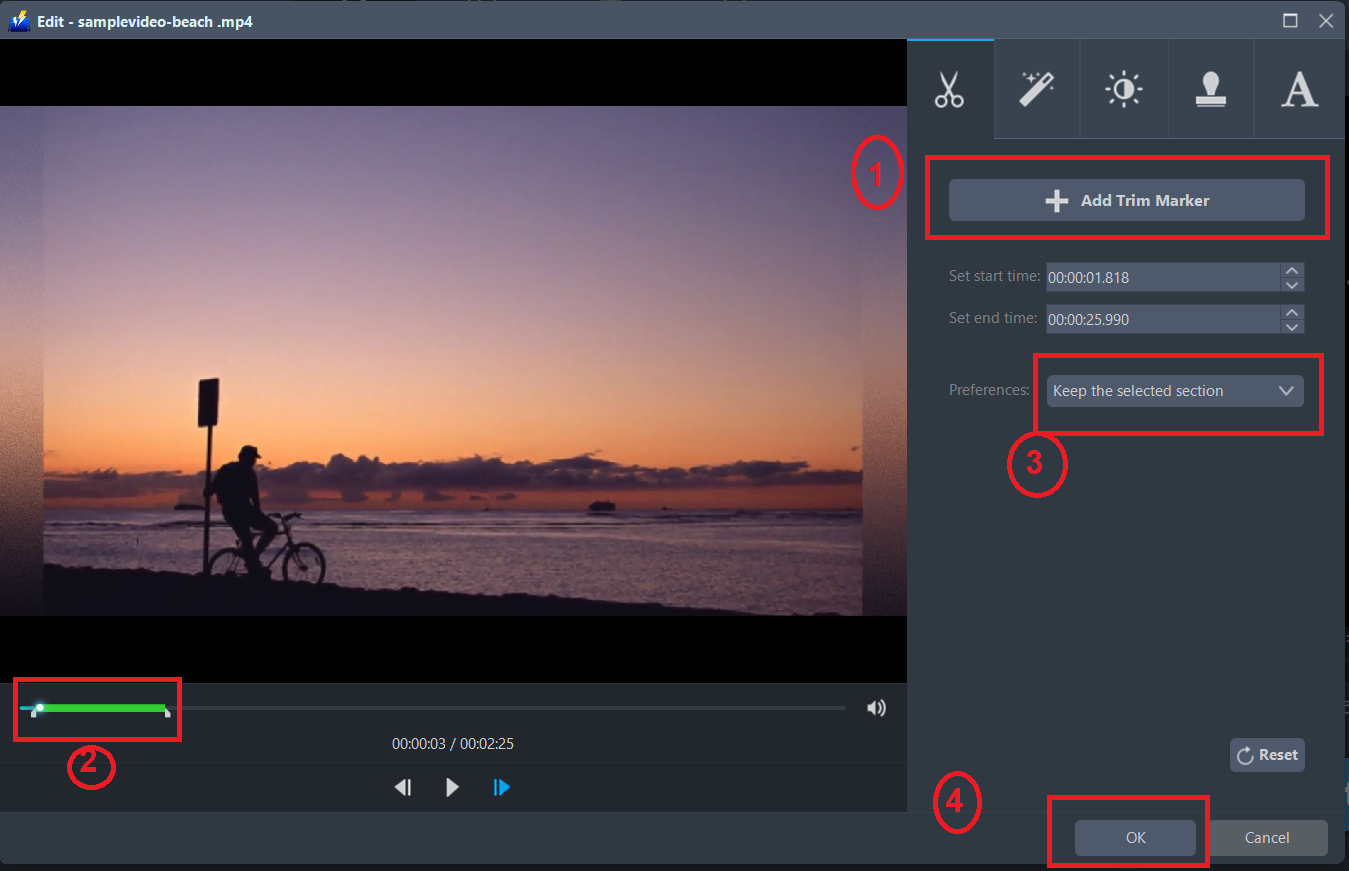
The built-in video editor will pop up, with its help, you can make the perfect movie. Adjust speed and volume, trim, cut, crop, rotate or flip videos. Add effects, subtitles, and watermark while adjusting brightness, contrast, and saturation that will make editing conveniently easier.
For example, you can trim your video as shown below:
1) Click “Add Trim Marker”.
2) Drag the mark as shown below to select the part you want to cut.
3) If you want to select multi-sections, please repeat 1 and 2.
4) Choose “Keep the selected section” or “Delete the selected section” from “Preferences”.
5) Click “OK” to save the setting.
Step 3: Convert MP4 to FLV format
3.1 Set the output format
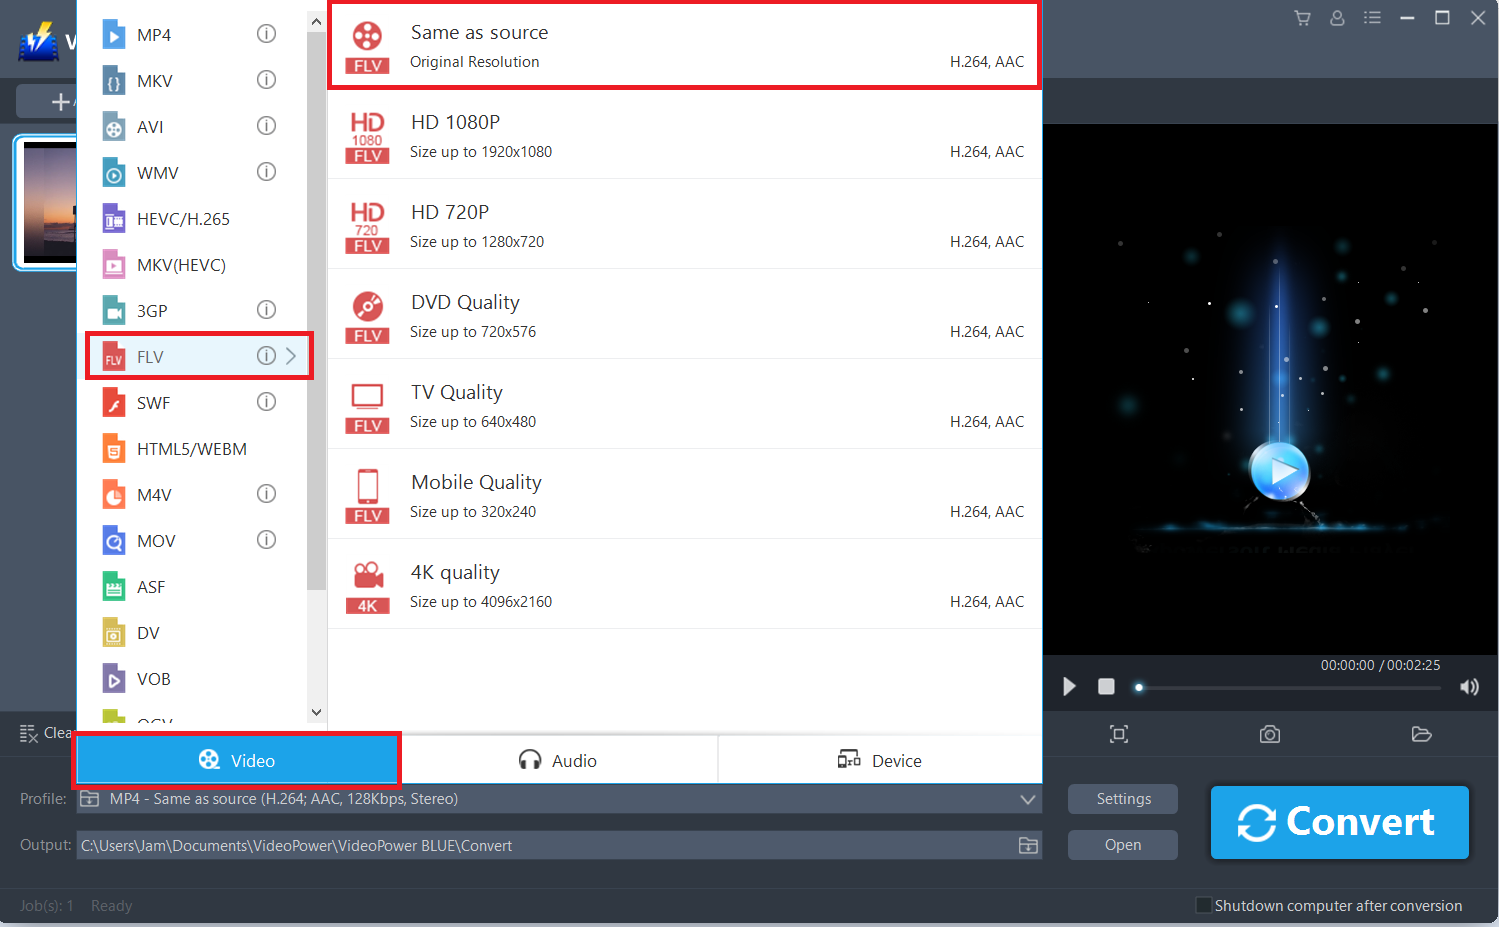
Click to open the “Profile” drop-down menu, then choose the format you want from the profile list. Here choose “Video”, “FLV”, and quality “Same as source” or other options like “HD”, “4K quality” as per your need.
3.2 Start Conversion
Return to the file list.
Click the “Convert” button, then the converted FLV file will be saved in the default output folder.
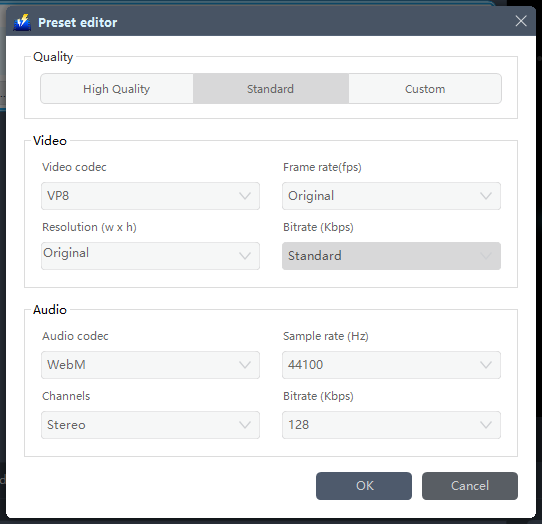
You can also customize frame rate, bitrate, codec, etc. manually. Just click the “Settings” button to enter the “Preset editor” window, then you can change the value and click “OK” to save the settings.
3.3 Find the Converted FLV files
A pop-up window from the program will appear informing you that the conversion is complete.
Click “OK” to open the folder of your saved converted FLV files.
Or you can click the “Open” button to find the FLV video.

Conclusion:
FLV files have been widely used as the format for embedded video on the web and viewable on most operating systems so converting files to FLV is a great choice.
VideoPower BLUE is quite simple to use with an easy-to-understand interface. The conversion speed is very high and one of its most highlighted features is it supports nearly all types of video/audio files to be converted. It has a built-in video editor that will enable you to edit slideshows or videos, apply watermarks, effects, and other basic video editing options such as trimming or cropping.


