





Tips Index
It is the era of online learning where everything can be learned and taught through the internet and most likely through giant video sharing websites like youTube and Dailymotion. More likely students and students wanna be might surf through these video websites if they don’t understand a specific lesson that was taught at school or at their workplace.
You can always replay the part you don’t understand and you have hundreds of options on which teacher you might like since teaching styles vary in just a click or tap of your finger. Everything nowadays is at a fast pace especially learning, so we need a trusty application that could cater to this need for us especially everything nowadays is digital and portable.
We could replace black and whiteboards with our screens, lasers with mouse pointers, and chalks with highlighters and annotations through a very useful screen recording application. So what’s the best way to record lectures? Selections may vary from the basic ones to the more efficient.
We always lean towards that has the extra features that could let us go beyond our usual; teaching and tutorial mean, something that would spark creativity in us and creating a better learning environment.
Trying to find a record lectures app?
VideoPower GREEN is a very powerful screen capture and recording software that has a lot of functions perfect for any tutors and teachers who would like to extend their teaching means online, it is the best way to record lectures.
You can try to use the software for free by downloading its trial version below.
Record Screen
Step 1: Choose a sound source
If audio is needed in recording, choose the desired sound source among “System sound, Microphone or System sound and microphone” on the “Audio Input” menu. If audio isn’t needed, just choose “None”.
For recording lectures on the internet, we suggest choosing “System sound”.

Step 2: Choose a recording area
Click on the “Record” button to choose the recording mode among “Full screen, Region, Audio, Web camera, and Around mouse” and then select the area you are going to record.
Full Screen:
The recording area will be the whole screen of the computer.
Region:
The recording area will only be a specific area of the computer screen.
Audio only:
Select “Only Audio” to record the audio-only.
You can save your files like MP3, AAC, OGG, WMA, WAV, FLAC, and other file formats.
Web camera:
Select this option to record video from an external webcam or a built-in laptop camera.
Around mouse cursor:
The mouse position is the center of the recording range. If you move the mouse during recording, the recording range will follow the movement of the mouse.

Step 3: Record screen activities
After choosing a recording area, a prompt pop-up will appear. Click “Ok” to start the recording.

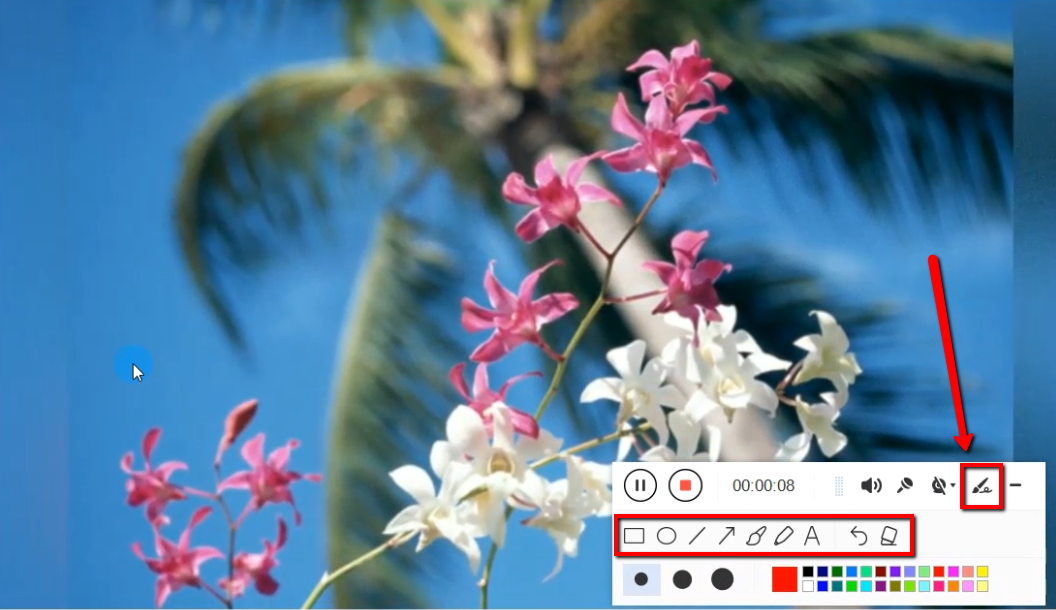
While recording, adding annotations like lines, arrows, shapes, texts, highlight, blur, etc. is possible. Just click the edit button to show the editing toolbox.
Step 4: End the recording
Click the “Stop” button to stop recording.

After recording, the screen will automatically redirect to the recorded file list on the main interface window.

Conclusion:
VideoPower GREEN can even go beyond just a recording lectures app. This amazing software can record anything on your screen, even videos from Youtube that you’re unable to download is possible.
This powerful software shapeshifts from your daily needs from personal to school, to projects and even go beyond business. Nothing could ever be undone in this application, it stretches creativity and has limitless possibility. Try it now!


